
Welcome to Lesson 2. I hope the Niche selection wasn't wracking your brain too much. Just know that no matter what Niche you have selected, together we will make sure that you are going to have the best chance for success.
Ok, so now that you have your Niche selected, we now know the direction we want to go with your brand/business. I know some of this may not make sense right now. Don't worry, moving forward the pieces of the puzzle are going to come together.
Starting with a big piece today, your website. We are going to be taking our niche idea and turning it into a tangible business starting with your website.
Building a Website – Don't Let it Scare You
Building a Website may be pretty terrifying for a beginner, but I'll tell you right now that these days it's never been easier. Actually, I even think you may find it rather fun.
Because I want you to follow along with me within the training, you will need the following tools:
- domain name
- hosting
- keyword research tool
You can go ahead and source those out yourself or simply use the same tools that I am within the training. If you want to go along with the ‘copy me' model (which I recommend) then go ahead and get a free Starter Account at Wealthy Affiliate. They have everything that you need AND are the same tools that I am using throughout these lessons.
Now, the first step today will be building your website. This will literally take you less than 30 seconds. Check out the video below where Jay (a Veteran WA Trainer), shows exactly how easy it is to create your website.
Task 1: Build Your Website
Your website is your foundation of your business. It is where all of your traffic is ultimately going to come to, where you are going to build brand and trust within the industry, and where you can promote products/services and generate $$$!
There are 4 steps in the website build process, that I am going to walk you through here. To access the SiteBuilder and EVERYTHING related to your website, you will simply click the Websites tab on your WA dashboard then scroll down and click on site builder.
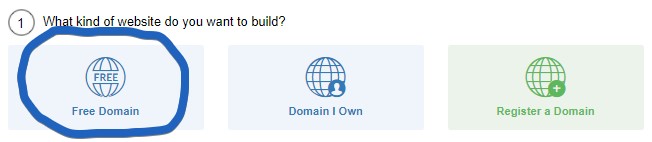
Step 1: Choose the Kind of Website
On Site Rubix you have the options. You can choose to create a free website or you can go with using your own domain name. Ideally, you will have your own domain, but that can come with time.
With your free Wealthy Affiliate Account, you can “register” your very own domains using their state of the art SiteDomains platform. This will allow you to instantly set-up your own domain for your own use
For the sake of this training, we are going to be choosing “On a free domain”.
Step 2: Choose a Domain
Remember in the last lesson when I had you choose a “niche”? In this step, You are going to be choosing a name for your website and placing it in the “domain name” field. This is because this will be your website URL and brand moving forward.
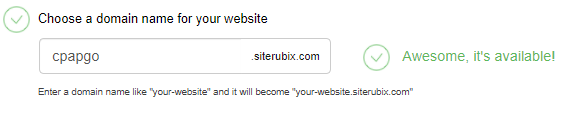
When you type in your domain, it will let you know if it is available or not. In my case it was, but if your first choice is not available simply do another search until you find a domain name that works for you.
You cannot put spaces in your domain name, hence why my domain is: “cpapgo”.
Step 3: Choose a Website Name
The name of your website should match your domain, but it just needs to be grammatically correct (with proper spacing). You can see below my example of this:
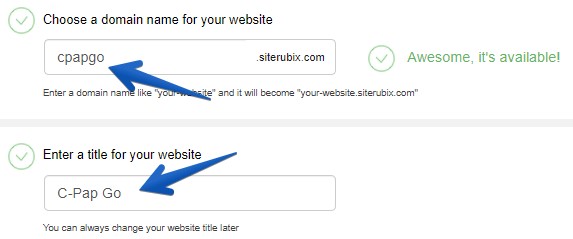
Domain: cpapgo
Title: C-pap Go
It is as simple as that. Don't overthink this step, your title will be the same as your domain.
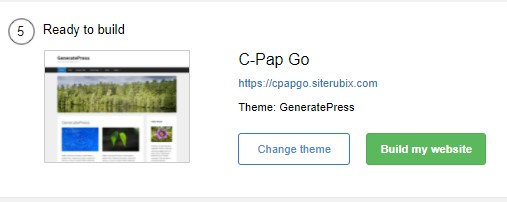
Step 4: Choose a Design
The last step is choosing a “look” for your theme. On Site Rubix (also on other site builders), you will be given a choice of premade themes for your website. As a beginner you are given access to a main theme that was designed for quality, speed, security, and overall theme design.
However upgrading your account will grant you access to thousands of theme designs. Check out the pic below.
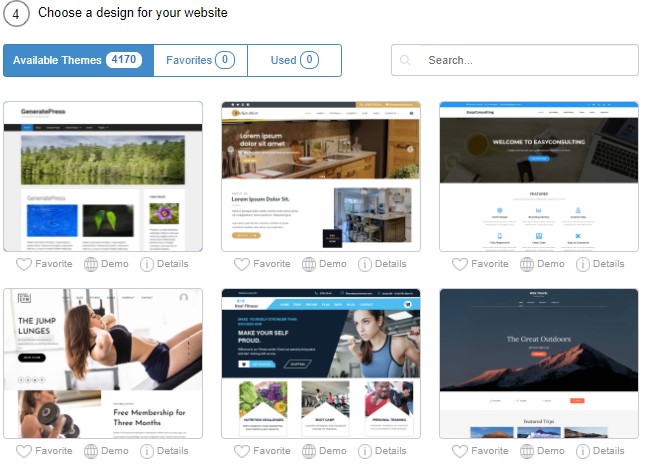
Click on the design you like and your website will be built for you.
There you have it, you have your website officially up and running online. There are still a few things we will need to flesh out in your new site. Just some technical stuff, but don't worry I'll walk you through it. It's just some easy clean up work.
Step 5: Setting Up Your Website
In this step, I am going to be walking you through the process of the initial website set-up. This includes the removal of “default” content that is installed with every website as well as a look around of the back office of your website.
Additionally, I am also going to be walking you through the activation of your “Plugins” and be walking you through the benefits of the plugins (feature extensions) that have been installed automatically with your website.
Again, We will be using the Site Rubix platform on WA. So, if you would like to follow along, then make sure you sign up for your free Account Here.
Task 1: Login Into Your Website Back Office
In order to do this, you need to log into your website. This is very easy to do and can be done using the “Log In!” button (as shown below).
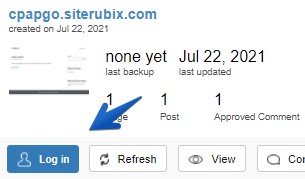
This will automatically show you all your users you have associated with your website and from there you can log into your website.
Task 2: Activate and Update Your Plugins
After you login, you will see your WordPress administration dashboard for your website (see below).
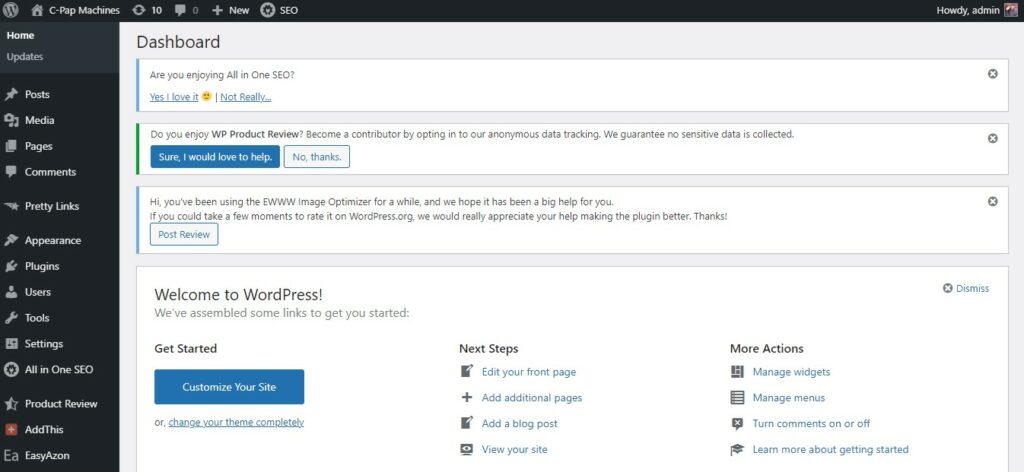
This may look completely foreign to you if you have never logged into a WordPress website before, but don't worry, you will get the hang of this and there is a ton of help within the Wealthy Affiliate to work you through any questions/issues you may run into.
WordPress is the most powerful and widely used website platform in the world. It is used by over 30% of ALL websites (millions) and it also has a wide range of “add ons” known as plugins that you can use extend the functionality of your website.
When you install a website at WA they pre-install three of the most useful plugins with your website automatically and your first step is going to be activating these plugins.
You will see the All in One SEO plugin. This is a plugin that is going to help you get found and ranked by search engines like Google, Bing and Yahoo.
You will also see the Classic Editor plugin, which is already activated. This gives you access to the classic editor when you upgrade and create posts within your back office, which is preferrable (in particular when getting started) to the new and more modular editor. It is going to make your life a lot easier and it is already set up for you so you have to do nothing from your end.
Lastly, the Kraken Image Optimization plugin is going to compress and optimize all of the images on your website automatically. This is really sophisticated and advanced platform that is going to lead to better website speeds, a better user experience, and better search engine rankings. This is already set-up optimally for you.
Task 3: Delete Default Posts, Pages and Comments
Every new WordPress website that you install will come with “default” or dummy content that is added with every website install. You want to get rid of this content before you can start creating content that is relevant to your niche.
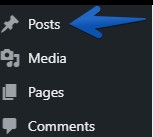
The first thing you want to do is delete the default post that is added with each website.
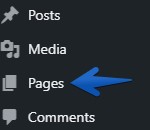
Click on the Posts button, within the side menu.
This will take you to the posts page where you will go to see a list of all the posts on your website. A post is simply a content page on your site (we will be explaining them in more detail later).

Simply “mouse over” the post area and it will reveal the post management buttons. You will want to then click the “Trash” button. This will delete the default “Hello World!” post.
Do the same with the “Pages” link as well. There may be a few different Pages, including the Privacy Policy page. You can delete all of these pages as we are going to be starting fresh with our own content.
**Do note that there may not be both default Pages and Posts. If that is the case, just move on.
Step 6: Creating Custom Menus on Your Website
One thing that we always need to remember is that we are building our websites for PEOPLE, and our visitors and how someone would view our content and our navigation is what should dictate how we present our content.
In other words, if your website is difficult to navigate, people simply won't. The may read your content, and then just move onto another website. You can increase your website “page views” and overall website revenue if you understand proper navigation
Introducing “Custom” Menus in WordPress.
The default WordPress menus work in very strange ways and can be quite awkward. Typically when you add a page, it automatically goes to the main menu. A post, will go to the homepage blog roll (not the main menu).
As a website owner, you want FULL control of your navigation as your theme by default won't do a very good job of this. Fortunately, it is quite straightforward to create Custom Menus.
Navigation is going to be a critical element to your user experience moving forward and will impact your rankings (as Google ranks sites with proper navigation better), so this is an important step here.
Task 1: Create a Menu
There are a few simple steps to creating a custom menu. The first thing you need to understand is where to find the Menu management section within your WordPress admin area.
Under the Appearance, click the Menus sub heading.
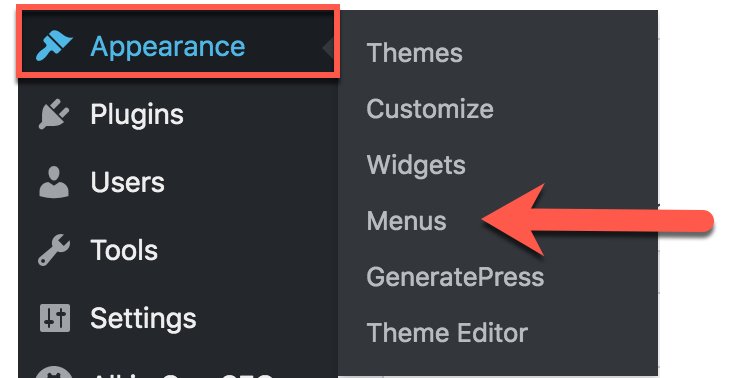
This will take you to the custom menu creator.
Under the left tab, you are going to see a Pages section. Pages are not added to your navigation by default, so you are going to need to click the Pages tab and it will show a list of your Pages.
In this case, we have only create the About Me page. Click the check box associated with that, and then click the Add to Menu.
**Note: Most themes by default will add Pages to the top menu, but if you don't see your Privacy Policy within the Menu Structure section, you will need to add that.

Your About Me page has now been added to your menu structure. As seen above.
Once added to your Menu Structure, you can reorganize your menu in any way you like by dragging and dropping them in any order.
Upon completing my menu order, click the “Save Menu” button and you will establish your new menu.
After you have done this, you are going to want to add your newly created menu to your website, to override the Main Menu on your site. You are going to see a new tab created after you have created your new menu called “Manage Locations”.
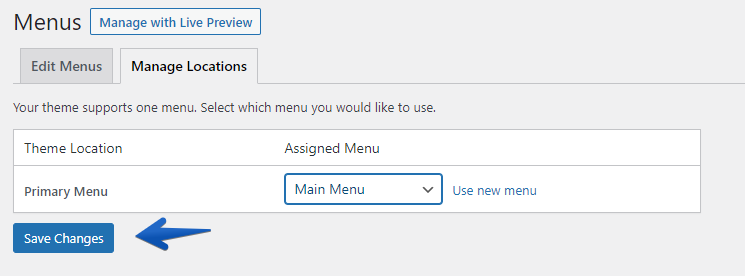
You will want to click this tab, and then under the “Main Menu” item you are going to choose the menu you just created, in this case it is called “Main Menu”. After doing that click Save Changes. You are set!
For example purposes, here is what my live website looks like with my newly updated menu.

And we are done. It is as simple as that and as you continue to build out your website, you are going to be reorganizing your websites regularly, managing this menu and likely creating “sub menus”. Don't worry, you will easily get use to editing and designing your site. Plus now that you are in the Wealthy Affiliate family you will have thousands of community members and many seasoned veterans there to help you along the way.
Nice work thus far! Next I want to go over the process of creating your content to get traffic to your site. Let's do it!!

Learn how to scale your online business in the shortest time available.